Written by Alfred n the Fettuc
NB : Thanks to Laukku to have pointed out about the pixel smoothening filter Boxer was using. I removed it so the screenshots should look better this week.
Last week we had put our hands on the second grain of sand. We stopped after another cryptic intervention by the Borgol and we were standing in front of three doors. Three doors can only mean one thing in an adventure game : a MAZE! Don’t worry, though, this is probably one of the simplest mazes I’ve seen in my memory of gamer.
 |
| Behold the fabled doors of the sword, the sun and the Aston Martin. |
The green tablet on the left is unreadable, even with the help of PETROY, but you can put your own tablet in front of it. However, it is still unreadable. You have to click on the “eye” on the right of the screen. It fires a laser that changes the text on the tablet. Now PETROY can read it. The text is a trap, though, and you have to fire the laser a second time to have the complete text. Funny trap, even if the consequences are not that bad, as you’ll see in a second.
 |
| That’s cold, man. |
The three doors are locked by the same code that show pictures of a bow, an animal, a pot and a roast. My first try is the good one as you just have to click on the bow, the prey, the pot and the roast in the logical order and the door opens. Using PETROY on the keycode also gives you a basic clue. I select the first door on the left to avoid the one showing the sun and I arrive in another room.
 |
| The snail? The three-legged dog carrying a snail shell? |
I get a green vial that’s blocking the mechanism and I am confronted to another keycode. Despite the initial hint (that you can see on the screenshot), I need the help of PETROY to understand that I’m supposed to enter a number of little squares equal to 8. I then press 1, 3 and 4 and the door opens… to the guardian’s lair.
 |
| Easiest maze ever. |
I reload a save to try the other doors. The other door puzzles are in the same style. One asks me to multiply and divide little squares patterns but nothing overly complicated. If you follow the doors showing the sun, the moon or the water, you’re not really led to your loss but have to start the maze again. I try the different combinations of doors and always end in the guardian’s lair, with the vial in my hand. So it turns out you just have to choose the first door on the left in order to solve the maze in less than two screens... The guardian has been rendered feeble and weak by KRAAL’s spell and I have to prepare an antidote.
 |
| Do you think the developers were just reusing their Halloween latex masks? |
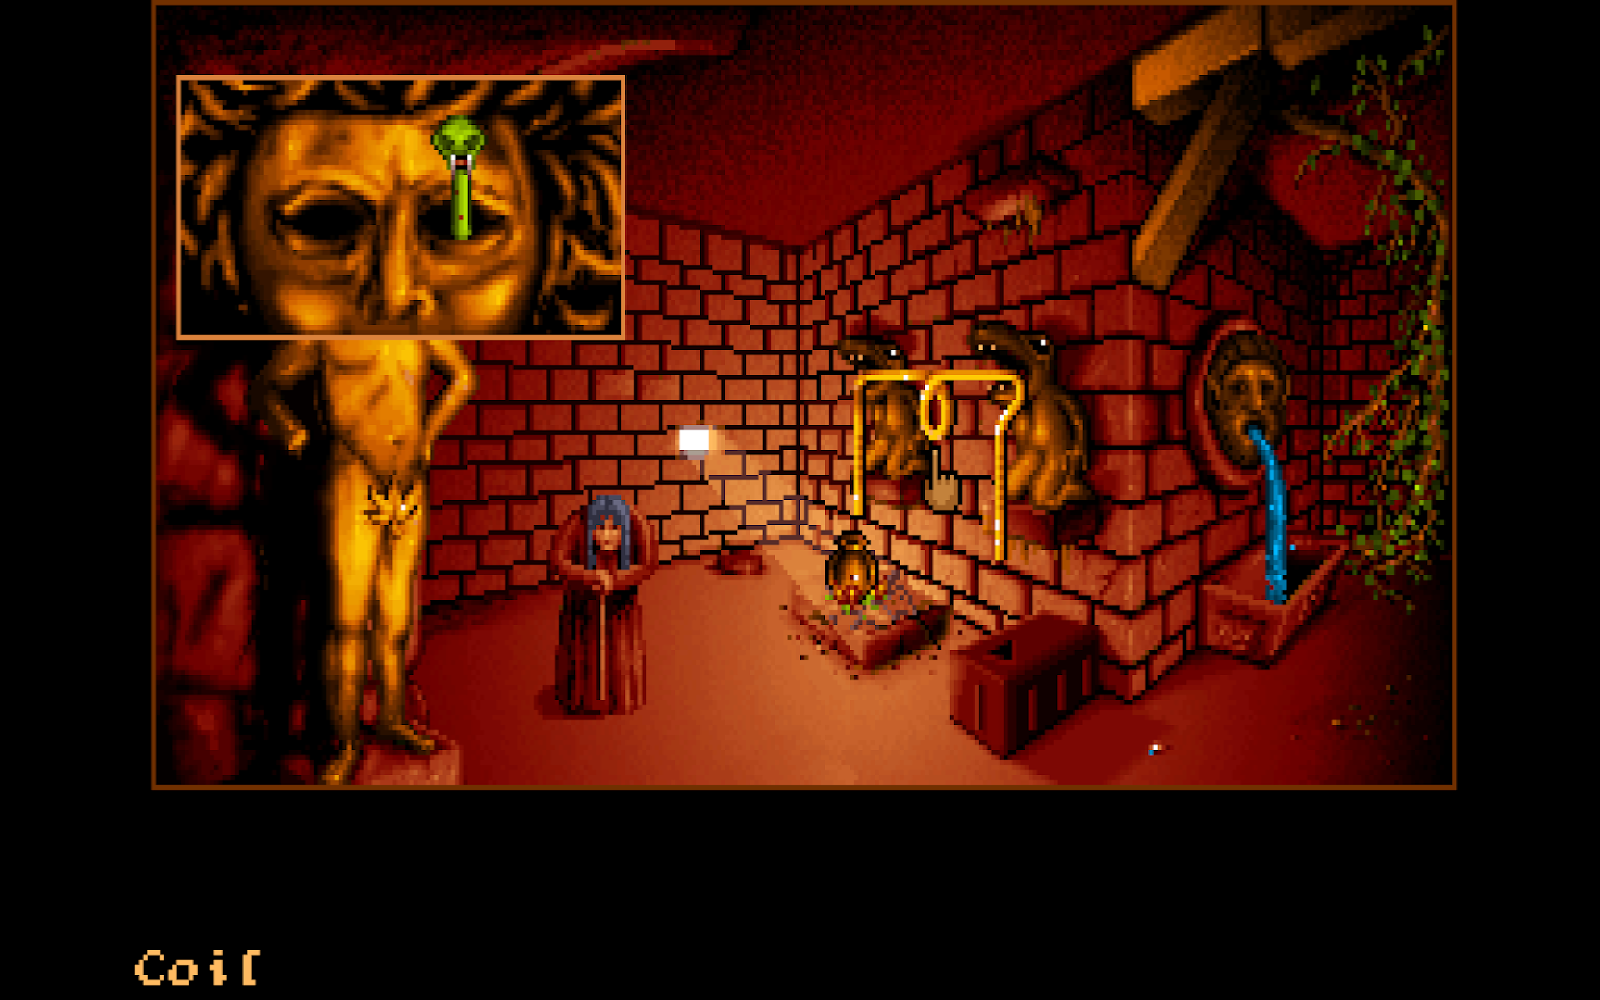
Time to explore the room and make an antidote. I get the rag that’s covering the head of the statue on the left, find a coin and a hammer. Moving a brick from the wall on the left let enter a beam of light inside the room that’s suspiciously illuminating a hearth. I put the wood planks on the hearth and a spare gargoyle next to its friend on the ledge.
 |
| The same room, after ten seconds of a kleptomaniac adventure gamer let loose in it. |
Examining the face statue on the right wall, I get some lichen out of its teeth and discover another easy puzzle.
 |
| Hey, it’s Harry Potter’s moustache! |
Following the arrow on the moustache, I press 12, then 4, then 6, then 3 and it works. The water flows from the mouth of the statue, spitting a magnifying glass in the process. All the clues tend to concur : I can now safely bet that I’ll be lighting a fire in the hearth any time now. Simply using the magnifying glass on the beam tells me that I’m lacking something right now. I add the lichen to the hearth. Searching the leaves on the right in order to find some more fuel for the fire allows me to get a leaf but I can’t seem to use it on the hearth. Using a hammer on the statue allows me to get the vase from its arm.
 |
| CRASH! Don’t worry ma’am, nothing to be afraid of here, only doing my job. |
The vase fits nicely on the hearth and now I can use the magnifying glass to light the fire underneath. Nothing else happens, though, and I spend a bit of time pondering what to do next. Examining the head of the statue gives me close-up on the eyes that look greyish and dull. Using the rag on them reveals the eyes are… quartz! Yay! Time to use the pollen and venom vials again.
 |
| If I clean your statue, ma’am, will you forgive me for the whole “breaking its arm with a hammer” thing? |
Using the pollen and the venom on the statue eyes, I successfully turn them into a flower and a snake respectively. The snake talks to me (of course) and tells me it can “change an item to look like it”. It dawns on me. The copper pipe! It works indeed and my pipe turns into a long still-looking coil. I put the long pipe in the mouths of the gargoyles and pick up the flower in the other eye. Now we’re getting somewhere!
 |
| Now we’ll study the use of magic in the creation of moonshine booze. |
Out of my proven technique of “trying a lot of things on other things”, I realize that I can put the flower on the vase that’s getting hot on the hearth. It starts to puff smoke into the coil. However the coil seems to have a leak somewhere. I put the vial I found in the maze on the other end of the coil in order to receive the distillation. Trying to use the rag to plug the leak of the coil tells me “it would work better wet”, so I first put the rag under the fountain and… tadaaa! It plugs the leak. I wait for a bit but nothing else seems to happen, so I’m guessing I forgot something. Putting the leaf I found earlier on the vase seems to work, though, and the distillation starts! I’m guessing the leaf serves as a lid of sorts to make the flower boil.
 |
| Of course, that’s totally what I wanted to do and not a stroke of luck. |
Giving the potion to the guardian rejuvenates her and give her back her real appearance!
 |
| And makes a tiara appear in her hair for some reason |
A little statue has appeared in the corner of the room so I get back the coil and turn it back into the copper ball in order to touch the statue with it. A door opens in the wall and OHKRAM appears to me once again! I got the third grain of sand! I now just need to put them in the REVUSS.
 |
| I really have to wait two days alone with the boring twins, the senile gnome and the sarcastic vampire? |
I finally arrive in front of the tabernacle holding the REVUSS. Opening the doors reveal that the REVUSS has been stolen by KRAAL! So it seems getting the three grains of sand was only the beginning of the ordeal!
 |
| If KRAAL has broken the REVUSS, you just need to find the 1.256.789 other grains of sand. |
OPALE appears to me and tell me that KRAAL has taken the REVUSS in his lair on Volcano Island. I have to find a secret passage here in order to attain the temple gardens and from there, find my way to Volcano Island. Time to ransack the place! I get the necklace which is the third sacred jewel. Putting it on the copper ball gives me… a sword! Yay! As MorpheusKitami commented last week, I indeed find it quite fun that the third transformation of the copper ball gives me a sword while WEEN’s favorite sport was leaving various swords behind him…
On the pedestal on the right, a text tells me that “I will find an object in the maze which will help me get out and put me on the road to the volcano”. Does this mean I have another maze coming or did I miss something in the last one? In the chest on the left I find a horde of spiders preventing me from getting what appears to be a useful item in the bottom of it. I also find a little vase on the right of the altar that contains a key and get a glove from the left statue, which I use to search the chest.
 |
| Oh and don’t make the same mistake I did and look up “trapdoor spiders” on wikipedia. These things are the stuff of nightmares. |
Putting the heart in the heart-shaped orifice on the right statue does… nothing. I randomly click on the statue and manage to move its head. However, nothing more happens and clicking on the scales it’s holding doesn’t seem to work as well. In another completely random move, I get the chalice and use it on the scales… and it works. The statue opens a secret passage!
 |
| Yeah, because it totally makes sense. |
The problem with this solution (as it is with a lot of puzzles in this game) is that it works only because you have access to one or two screens at a time. Considering you have five to twenty hotspots by screen and only a handful of items to try on, you’re bound to stumble upon the solutions of each puzzle every time, even if it’s by trying a lot of random stuff on other random stuff. It usually makes sense (using the glove on the spiders for example) but I have to admit that in some cases (use chalice on scales), I don’t think I would have tried that if I had access to ten screens at the same time and multiply the possibilities of item interactions tenfold. But moving on…
 |
| The Palpatine© security system |
Behind the statue I find a locked door that is protected by a magic security system that shoots lightning. I can’t seem to approach the door in order to try the key I found earlier. I try different items, the hammer to break the orbs of the copper pipe to connect them, but nothing works. Back in the main room, I search every nook and cranny to see if I missed something, and yes. Behind the tapestry on the left of the tabernacle, I find two big mirrors. Putting them in the slots around the door allows me to gain access and open it with the key I found in the vase… Victory!
The corridor leads to two similarly-looking doors. I randomly select the one on the right and arrive in what appear to be the temple gardens. Reloading an earlier save and selecting the door on the left leads me to a totally different screen, so I think I found the second alternative route of the game. For this playthrough, I’ll stick to my initial decision and go through the right door, but I’ll definitely have to come back there in the end and try the alternative path.
 |
| Weird monster #752 |
This place is not a particularly welcoming one. If I click on the gopher, the ants or the snake, each one of them show me teeth or fangs and none let me approach. I’m guessing I’ll have to neutralize each animal before getting access to the gate behind the ant queen. I find a bag behind a tree which I use to catch the snake (it takes me a few tries because once the snake is in the bag, you have to click on the bond around the bag to close it). Under the snake, I find some pearls that look exactly like the ones the ants are carrying to their queen. The mongoose (because that’s what the gopher is) is blocking the way to a bush of digitalis. I’m sensing I’ll have to make the queen sleep with pearls and digitalis (and as we’ve seen earlier on wikipedia, make something sleep with digitalis is not a particularly pacifist option).
 |
| “Use hammer on mongoose” would be a solution if only the game let me. |
The hint that I have to get the mongoose attention away let me think that I’ll just have to solve one animal problem with another and I give it the snake in a bag. It works and the mongoose disappears into its burrow in order to devour his prey. I get myself some digitalis. I also find a femur next to the three on the right but can’t seem to do anything with it. Time to focus on the waterfall. Using the cauldron doesn’t do anything, but the pipe does work by rerouting the water and allowing me access to some kind of basin beneath it.
 |
| Pipe dream. |
I can use the basin to store some of the pearls and add digitalis to them. However, trying to use this mixture on the ants doesn’t work. I’m guessing I have to smash them somehow. My hammer is useless as usual but the femur works and I now have access to “what could send a whole army to sleep” according to Ween. Aaaand… nothing happens. I can’t feed it to the ants nor to the queen. I have to admit it’s not the first time the game stumps me while it should allow me to do something. I mean, Ween himself tells me I have something that should work but no, I have to add another ingredient to the mix.
 |
| Oh come on! Just eat the damn thing! |
Thankfully, it doesn’t take me long to find said ingredient. The tree on the left is a hotspot so I can do something with it, like cutting it with the sword to get resin or something. So, I take the pipe, use the tiara on it to turn it into a ball, then use the necklace on it to turn it into a sword, then cut the tree with it, then use the necklace on the sword to turn it into a ball, then use the tiara on the ball to turn it into a pipe, then place the pipe back, then try to use the basin to get the resin, then realize it doesn’t work, then get the pipe, then use the tiara on the pipe to turn it into a ball, then use the ring on the ball to turn it into a cauldron, then try to get the resin with the cauldron, but it doesn’t work, so I take my ring and… Well you get the idea. If it sounds tedious, it’s because it really is. The game would have benefited tremendously with the simple idea of NOT having to go back to the ball form every time you want to change the shape of the ball.
 |
| Two seconds-animation of a shape changing ball is two seconds too long when you’ve seen it five hundred times. |
Turns out I once again didn’t comb the place thoroughly enough. In the shadow of the down-left corner of the screen I find a root that I missed. Using the root on the resin allows me to get some. I get a little bit of despair when I try to use the resin on the mixture and see that it doesn’t work, but using the resin on the ants works and traps them!
 |
| Gotcha, you little red monsters! |
I can now give the mixture to the queen that disappears in a puff of smoke (wow, this digitalis thing sure is potent). I get access to the gate behind the queen, that’s locked in place by a rope and a weight, so I get my pipe back to turn it back into a ball THEN into a sword, and cut the rope. Behind this gate I find another garden, with a view on Volcano Island! I’m getting close!
 |
| So close and yet so far... |
This is when the genius twins confess that my haversack has just been stolen by a dangerous drooling terrifying flying monster of some kind. Stupid morons. Now my inventory is empty… They tell me that the monster also has caused a landslide that has blocked the staircase leading to the beach.
 |
| The nightmare of any adventurer. |
Time to pick up some more random stuff in order to fill my inventory once again. The first thing I find is a bowl, that I use to pick up some resin and put it on the red flower because… why not. I can pick up the horn from the skull on the right and find a lot of other stuff I can’t pick up but will probably use on this screen : a piece of wood, a metal pot, a triangle-shaped stick and some mushrooms. After a bit of pixel-hunting, I find a hotspot on one of the eyes of the skull. Clicking on it makes a worm exit from said eye.
 |
| This one is kinda cute. |
Putting the worm on the mushrooms, it tells me that they’re delicious, but they are even better when they are giants and that I have to put spring water on them in order to make them grow. Then, a suite of weird things happens. A red bird flies above me, then a fly exits a bush and get caught on the resin-covered flower. Talking to the fly tells me it’s apparently a spy from KRAAL. It starts to say it will sting me but then the bird comes back and attack the fly.
 |
| In my humble opinion, the bird would have made a better spy, KRAAL. |
I try to get my friend the worm again, but it tells me it won’t exit the skull before the bird is gone. So I guess I have to get rid of the bird, then make the mushrooms grow in order to make some progress. Trying to hit the bird with the piece of wood or the horn tells me it’s too quick for me to catch it. However, using the horn on the piece of wood put them next to one another. It kinda looks like a pickaxe but I’m lacking something to hold both things together. More pixel hunting reveals that I missed a liana in the bush behind the flower. Using the liana, I tie a perfectly functioning pickaxe.
 |
| Mc Givween strikes again! |
Well now that I have a pickaxe it’s… no use whatsoever. I can’t use it to attack the bird nor dislodge the mushrooms. Back to square one. I spend a LOT of time trying to do different things but to no avail. This puzzle is one of the most difficult of the game but also makes perfect sense. It dawns on me that the green baton I found in the bush behind the bird looks like a dowsing rod, but where do I need to use it? From the beginning of the game, everything works with hotspots. Click on something and something might happen. However, for this puzzle (and as far as I know, this puzzle only), you have to drag the dowsing rod on a hotspotless place on the screen for it to react. Then you know where to use the pickaxe in order to discover a water spring.
 |
| The screenshot is not overly clear, but the stick points to the bottom left of the screen. |
On one hand, this puzzle is making sense. Use a dowsing rod to find some water. And it’s a challenging one so I liked it. However, The fact that this is the only time you have to interact with a place with no hotspot means that the time you spend on this puzzle is mainly because you don’t think interacting with this spot will do anything. Putting a hotspot like “ground” would have made the puzzle too easy though, so it’s still a good puzzle. I’m a bit torn here, so I’ll ponder if I like it or not for the rating.
The rest of the screen is easy enough. I use the metal pot to get some water, put it on the mushrooms to make them grow giant. It dislodge the rocks from the top of the staircase, as well as a lonely stone that I can throw to the bird to make it leave. The bird gone, I get the worm and use it to eat the giant mushrooms.
 |
| That is one hungry worm. Thank god it’s vegetarian. |
And finally I gain access to the beach. Volcano Island is not far from here and there is a boat on the shore that will probably let me access it. It’s time to wrap it up for this time, folks, as we’re getting closer to KRAAL than ever before. I have to admit I have no idea if the game is coming to a close or if I’m only halfway through it, but I’m really enjoying my time with it! Join us next week to see if we manage to get back the haversack and use it to hit the stupid twins on the head.
 |
| Oh my, are these strawberries on the bottom left? This screen will see the return of our beloved fruit-eating vampire, I can feel it. |
Session time : 1 hour 45 minutes
Total time : 3 hours 30 minutes
Inventory : Nothing (stupid twins)
Companions : PETROY, UKI, ORBI, URM


Those swords are useless, don't cha know? If it can't turn into a pipe by touching it with jewelry it isn't worth swinging around.
ReplyDeleteI can't wait until you try out the other path. Let's just say there's a very amusing puzzle to witness from afar there.
Honestly, I hate the dowsing puzzle more than figuring out the use of the chalice. If you not someone who can think of that its effectively impossible to advance. Its not a bad puzzle, I just hate it.
I guess the chalice is like a weight. It isn't something like the coin or hammer because someone going there wouldn't have those items.
I'd also like to point out that there's some definite translation issues with this game. Not just regarding whatever Uki and Orbi are, but in general. I have to wonder if the French version makes any more sense.
"I’m guessing the leaf serves as a lid of sorts to make the flower boil"
ReplyDeleteWasn't there a hint somewhere that you needed these two ingredients to make the potion or am I misremembering?
"The game would have benefited tremendously with the simple idea of NOT having to go back to the ball form every time you want to change the shape of the ball."
I concur, that is my experience exactly. And wait until lbh unir gb zvk qvssrerag cbgvbaf va gur pnhyqeba.
And I liked the dowsing puzzle just fine. But mainly, as you say, because the game sticks you in just one/two screens at a time, so you are bound to find a solution sooner or later.