
By Deimar
Prince Cassim's Journal: For Hathor I will have my revenge against my brother. He pledged allegiance to the God of Death, Anubis, bringing shame to our family. He even had the audacity of becoming the High Priest and constructed a pyramid in my territories. But worst of all, he has just kidnapped my beloved princess. What’s her name? At the verge of our wedding! We have to find him and kill him. It can only be us, so said uncle Boris. Wait a second, who is Boris?
The people have spoken and so I listen. And the people have decided a very weird order for my playthrough. But I am getting ahead of myself. Our first stop through history begins with the original twins, the Egyptian High Priest of Anubis and prince Cassim of… Egypt? My guess is as good as yours.
This waxwork runs entirely inside a pyramid full of traps and cunning puzzles. Or at least that what my travel agent told me before kicking me inside. The pyramid is composed by six increasingly smaller levels that we must climb to reach the chamber at the top in order to rescue the princess and kill our brother. Not necessarily in that order.
The six levels have a moderate amount of traps and combat, enough to not be very boring and not too much to be bothersome. The only thing is that traps make backtracking somewhat annoying. If you recall the catacombs in Elvira 2, there was a wire-based trap that you could avoid by clicking on the wire and selecting avoid in the menu. You had to do it every time you want to traverse a passage with a wire and be very careful, as failing to do that means death. Well, it seems like no one realized how annoying is to travel a dungeon full of those traps and they are back. Yay!
Another very common type of trap are pressure plates that free boulders. You can’t avoid stepping on the plate, so you have to outrun the boulder and step out its path. Those two are the most common traps through the pyramid, but there are special rooms with their own unique traps that are a tad more interesting, but we will talk about them when we explore the pyramid.

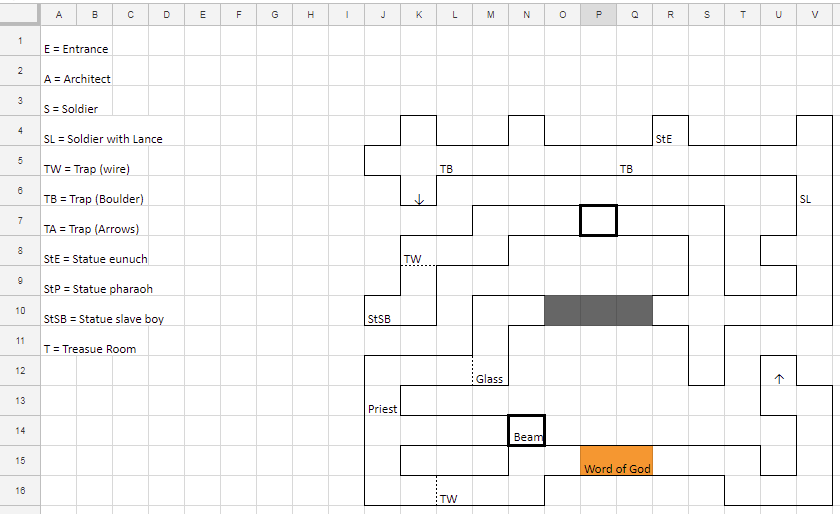
When we step into the waxwork, we are left helpless inside the pyramid as a stone wall rises behind us blocking the entrance. Sandy brown everywhere. Not the most interesting visuals to be honest. Advancing through the tunnel we can soon reach what seems the office of an architect. Someone was not very happy about his work, because the architect sits right at his desk with a dagger in his back. Our first weapon.
Inside the office I found a weight inside a pot, some blank papyrus, ink, an oil burning lamp, several jugs and pots, an amulet with a beetle drawing on it and the corner of a burned papyrus, showing a map with some stairs and columns. Closer examination of the architect also showed another papyrus under his body that contained a drawing of anubis with nine symbols.
Here I started to notice that the interface and the overall design are not very user friendly. For starters, you can’t drop anything. I took a basket and a carpet just to see if they might have been hiding something, but then I could not drop them. It is not very annoying, but I can see how you could end up with a lot of trash in the inventory and no way of organizing it, because you can take almost anything here. But that is a problem, as you have to look inside every single pot in the room, and there are quite a few. As they are containers, if you take them and accidentally drop something over them, the item will be stored. It is very easy to lose track of items this way. It actually happened to me with the brooch. There doesn’t seem to be an inventory limit at least.
Anyway, soon after leaving the architect’s office we meet our first encounter. A soldier carrying a sword. Combat in this game is very straight forward. We have to click on the two swords icon on the right and the cursor becomes a sword. Clicking on the left of the screen makes our character slash from left to right. Click on the right side does the opposite movement. And clicking on the middle allows us to thrust our weapon. I was not able to notice any major differences between the three attacks. My intuition tells me that thrusting does more damage, and it might be possible that hitting the weapon carrying arm of the enemy from the sides makes them hit for less damage. But none of that is a problem, as usually thrusting a few hits usually kills enemies very fast, especially after getting a lance from one of the soldiers in this level. So, combat is not very interesting, just a clicking fest as soon as you see the enemy. And no respawns, which is also welcomed.
There are also some statues decorating the pyramid that can contain pots with some items. Usual items are weights and tuning forks. Yep, tuning forks. If you are puzzled by this you didn’t play Elvira 2 or read through my playthrough, shame on you. There are some glass walls in the pyramid that can only be broken by using a specific tuning fork. For example the glass wall in this very level.
Another common element found in the pyramid are beams. These beams, or props as the game calls them, hold the ceiling of the pyramid. The idea is that you can knock them down and a stone wall from the upper level will fall. This frees the way in the upper level and it is usually safe to knock them down as soon as you see them as there is always a way around. The only problem is that we can’t do that right now, as it seem like we don’t have the necessary strength. More on that later.
If we continue exploring the pyramid, we can find some sand piles that we can take, another enemy in the form of a priest that is not very difficult to beat and a water-filled room. Looking into the water it seems like there is a large creature lurking below, but there is nothing we can do at the moment. Well, we can try to collect water from there, but as that ends up in our death, we can’t do anything productive. There is a treasure room nearby, but the only thing of interest are more pots, another weight and a tile with a hieroglyph.
Level 2

As soon as we reach the top of the stairs from level 1 we are greeted with a lethal puzzle. One that made me question if I was the one playing The Island of Dr. Brain. We are given two minutes to solve this:
To be honest, at first I was a bit puzzled about what to do so I decided to make use of the in game hint system in the form of old uncle Boris. Clicking on the crystal ball icon on the left puts you in contact with the realm beyond and we can ask uncle Boris some things. The interface for conversation is based on dialogue trees à la LucasArts but with some of the questions costing psychical energy (PSY in the status bar). So we can get answers to where is the princess and what this Anubis sect nonsense is all about for free, but asking about specific puzzles, like for example this one or how to kill the alligator in the pool, or asking for healing costs some points. A very small amount, so it was never an issue to contact Boris.
As I was already there, apart from getting a clue for this puzzle and the next I decided to try the heal option, which transforms all papyrus in healing scrolls, each one healing for 10 HP. I only had four papyrus, meaning I could only recover 40 HP, not even enough to top me up at that moment, so I decided to apply save scumming to combat, as a well placed hit with the spear can in one or two hit an enemy, saving precious HP. You level up quite a few times before reaching this level. In fact, in level one you level up after every single enemy and after breaking the glass wall. The only thing I noticed changing was that my HP was getting higher but even then I didn’t want the risk of reaching a point I was unable to continue due to lack of HP.
In any case, going back to the puzzle at hand, this is a magic square type of puzzle, but with a pentagram instead of a square. I will let you get the answer yourselves. Because maybe I am the evil twin. MUHAHAHAHAHA!... HA!
Once that is solved, exploration of level 2 is not very different from the first level. In fact, there are very few distinguishing things in the whole pyramid. This level introduces us to the pressure plates with boulders and the knockdown of beams. The first one is quite straightforward, as there are visible floor plates that when stepped on produce a sound and a boulder will soon come crashing everything in its path. Avoiding these is easy, as you only need to search for a side passage to hide but being careful, as boulders tend to do curves. For example, the boulder coming south from K4 will not stop until reaching M11. And the boulder will stay there, so it may block some paths.

We already commented on beams in level 1, but it is here on level 2 where we find a hammer in the statue of a slave boy at N4 that allows us to knock them down. Otherways, the whole south section of the level stays blocked by a wall at X11. So once you get the hammer you have to run back to level one to knockdown the beam, which blocks X11 at level 1 but opens the square at level 2.
Speaking of backtracking, the red square in the map is a pool of burning coal that we can not jump over. Exploration of this level produced another weight, another tuning fork and a pot full of entrails. This one can be used to lure the alligator out of the pool and kill it by throwing a spear. Sounds easy, but the problem is that there is no apparent way of throwing the spear. You have to start a combat and by trying to attack, our character will throw the spear instead, killing the alligator instantaneously
.
With the alligator dead we can fill one of the numerous pots with water to extinguish the fire at level 2. Do you think it would be that easy? Of course not, because one is not enough. Nor two. Nor three. The number is five, if you were wondering, which made me lose a lot of time searching nearby statues and the treasure room for pots to fill with water and going back and forth to the fire until I managed to completely extinguish the fire. And my only question to that is why. Why make your players come and go from one level to another filling pots with water until the fire is extinguished? This is just adding more hours of gameplay by torturing the player. Did I mention that you have to click on the wires and select “Avoid” to not die every time you pass by one of those traps?
After getting pass by the burning coal, the only thing of interest is another tile found lying in the ground. Taking it is a bit difficult due to the interface. You can move by clicking on the arrows/compass on the left of the screen, by using the keyboard arrows or by clicking in the edge of the gameplay screen. But the tile sits right at the edge, so there are only a few pixels where you can get ahold of it.
Level 3

Once again we have a deadly problem as soon as we get to level 3. This time, the puzzle is quite simple. You have a set of pipes linked together with some switches that make the water go one way or another. At the end of the pipes there are six bottles, one with the symbol of Anubis and the other 5 a cobra. The goal is to set up the switches so that the bottle with the symbol of Anubis is filled before the other ones. Quite a nice and simple puzzle. Even the position of the good jar is randomized every time.
After solving the puzzle, we are given access to level 3. This level complicates matters with glass walls by having you need a specific tuning fork for each wall. So basically, every tuning fork is the equivalent of a key to a door. Of the three glass walls here, only the first one can be broken with the forks we are carrying, while the other two need a fork from level 4, which means knocking down the beam here could be a death end, as you need the sand from level one to continue.
And what do you need the sand for? Well, there is a passage going south with a hanging pot in the middle and a Carving at the end of it. The carving is not very interesting but the pot is. It is tied by rope to a hole in the ceiling. At first I didn’t have any idea on how to continue but after striking the pot and seeing the rope disappear once it didn’t hold any weight gave me the idea of using the sand on the pot. And voila, that makes the carving disappear to show access to another part of the level. The only problem? The pot is cracked, which seemed to suggest that there was a timer on how long would the passage be open. For your peace of mind, you should know that there is no such a limit, but thinking there was kept me in my toes in this section.
The only other thing worth mentioning here is that there is a room with a pressure plate. Instead of releasing a boulder, this one makes one of the statues of an archer in the room shoot at you, killing you instantly. The trick here is that there is a rock nearby that can be used to activate the trap and then we can go inside the room and take a bow and arrow from there.
Level 4

No more puzzles when arriving a level here, but this level is quite more interesting than the other ones. The first thing of notice is the large chasm, black squares, in the middle of the level. When we reach there, we can see a chasm and some kind of pillar at the other end described as a stone needle, but no apparent way of crossing the chasm. It is nice that the underlying levels have nothing on those squares, so you don’t feel cheated with the map design.
Going the only way available, for which it is mandatory to have knocked down the beam downstairs blocking you from the rest of the pyramid temporarily, you get access to a new tuning fork that can be used to break the two remaining glass walls below. Which produces another tuning fork. God dammit.
So the only option with the needle that made sense to me was shooting the arrow, which made the needle fall and serve as a bridge. OK. At this point one would start to think that these cultist have a very rough day-to-day operation, having to continuously replace glass walls, shoot arrows to get access to the main temple…
After the chasm, we get another glass wall that we can break with one of the forks, another beam and the puzzle of the “Word of God” from the Last Crusade. You know, the one where Indy has to step on the letters of the word Jehovah in order to cross a trap room. Here is the same deal, but the letters are replaced by hieroglyphics. The goal is not to step on those associated with Anubis. Why would the cultist test your knowledge of all things not Anubis is beyond me, but the trick here is to pick symbols that do not appear in the papyrus we took from the architect at level 1.
Level 5

Level 5 starts with a very deadly trap. Once you enter the square hall at U8, a wall blocks your way back to the stairs and the passage starts to fill with poisonous gas. After several tries and not knowing what to do, I contacted Boris who told me to watch out for things in the floor and walls. Thanks for nothing I guess. There is a mirror in one of the walls but you won’t see it while navigating the hall. You have to turn on every single square and look at each wall, making this one a very annoying puzzle, because the gas starts to block your vision very soon.
Anyway, we have some experience on how to treat glass in this game, so it is not a problem for our collection of tuning forks. Afterwards, we find a passage with a dead artist, our twin brother doesn’t seem too kind on his employees, under a mural dedicated to Hathor, with a depiction of the deity’s name. The artist has another brooch with a beetle that he obviously is not going to need anymore.
Forward ahead we reach the end of the passage, a room with several not very inspiring murals. But we can tap each of them and the one to the south produces a hollow sound, which suggest something behind. To open the way, we have to attack the wall, which again doesn’t seem to be very in line with how to use objects in this game. This leads to a room full of carvings of snakes in the wall and a lot of holes. Trying to look at the holes suggest that there must be a lot of mot******ing snakes in this mot*****ing pyramid.
There is a tile in the ground, but trying to take it ends up in… a crash. Yes, the game crashes. Every single time you try to take the tile. I felt a desperation at this point thinking I wouldn’t be able to complete the game that I was at the point of writing a “Lost” post, which I am sure is a record for a main game. Lucky for me, people at the GOG forum had also found the bug and why it happens. There is a pot full of oil at the beginning of the game, at the architect’s office. Either I didn’t notice it or didn’t think it was important. That pot is the solution to this chamber but the game doesn’t know what to do if you try to take the tile and don’t have the pot with you. I would fire that programmer to be honest, because that some shitty code.
So I went all the way down, took the oil and went back there, dying a few times in the wire traps along the way, and with the pot in my possession now I could take the tile. And die. You have to drop the pot first, which breaks it and extends oil all around the place, light it, hope to not die in the fire and take the tile. Aaaaaaaaaand find another bug. When you take these tiles, they can simply disappear in your inventory. Not hide in a container as I suggested at the beginning. No, they simply disappear. Great.
One reload later I was capable to taking the tile with me, but I was blocked with no way ahead. I went back to the artist and the mural of Hathor could also be tapped and broken, showing the way to level 6. Yes, the map there looks weird, but I am pretty sure that’s because the chasm and the Word of God puzzle are not exactly 3 and 2 squares.
Level 6

Reaching level 6 puts us in front of a mural dedicated to Hathor with a hole for four tiles. In the mural bellow there is a box with the name of the deity, and we have four tiles with the same drawings in them, so it is a matter of putting them in place in the correct order. Take into account that we destroyed the mural to get here, so I should thank that I was blogging the game because otherwise I might not have had an screenshot of the mural.
The final level is quite straightforward. There are two treasure rooms with more weights and a room with a scale and a sarcophagus. The sarcophagus can be opened by inserting one of the brooch in the conveniently beetle shaped hole, which reveals the princess inside. She is quite eager to join us to escape this nightmare.
The scale puzzle is as basic as it gets. You have six weights, the last one can be found inside the sarcophagus after the princess joins us, and you have to balance the scale. I started to put weights in every plate and got it even as soon as I put all six of them on my first try just by trying to compensate the scale with every weight. It was just luck, as every weight has a different… well... weight and you have to take some attention to what you put in each plate. Getting a perfect balance opens up a passage next to the sarcophagus which leads to a very anticlimactic fight with our brother. He fell after two hits of my trusty spear. These twins maybe super evil but not very resilient.
Behind him, a gigantic statue of Anubis with a woman shaped figure at its feet. We can climb the statue to find a brooch shaped hole that once filled with the other brooch allows us to push the woman figure and escape the pyramid. Happy ending?
Back to the waxwork
And so, Cassim lived happy ever after. In my introduction to the game I forgot to mention this fellow:
He is Boris’ butler and he is in charge of asking us for the pirate protection code, which the GOG version has limited to always being the same number, and showing us to the waxwork. I didn’t mention him because even in spite of his creepiness I thought it completely inconsequential. That is, until I got back from the pyramid. Then he starts to follow me around pushing me to other waxworks. I am sensing some evil here…
DEATH BONUS ROUND (TOTAL DEATHS: 11)
It just occurred to me that I haven’t explained what I mean by unique death: those that have a unique final death image. For example, it is the same final image with spikes dying by the second level pentagram puzzle, the third level bottles puzzle or the Word of God puzzle, so all of those only count as one.


Session Time: 4h 25 m
Total Time: 4h 25 m
Note Regarding Spoilers and Companion Assist Points: There’s a set of rules regarding spoilers and companion assist points. Please read it here before making any comments that could be considered a spoiler in any way. The short of it is that no points will be given for hints or spoilers given in advance of me requiring one. Please...try not to spoil any part of the game for me...unless I really obviously need the help...or I specifically request assistance. In this instance, I've not made any requests for assistance. Thanks!
Prince Cassim's Journal: For Hathor I will have my revenge against my brother. He pledged allegiance to the God of Death, Anubis, bringing shame to our family. He even had the audacity of becoming the High Priest and constructed a pyramid in my territories. But worst of all, he has just kidnapped my beloved princess. What’s her name? At the verge of our wedding! We have to find him and kill him. It can only be us, so said uncle Boris. Wait a second, who is Boris?
The people have spoken and so I listen. And the people have decided a very weird order for my playthrough. But I am getting ahead of myself. Our first stop through history begins with the original twins, the Egyptian High Priest of Anubis and prince Cassim of… Egypt? My guess is as good as yours.
 |
| Where is Brendan Fraser when you need him? |
This waxwork runs entirely inside a pyramid full of traps and cunning puzzles. Or at least that what my travel agent told me before kicking me inside. The pyramid is composed by six increasingly smaller levels that we must climb to reach the chamber at the top in order to rescue the princess and kill our brother. Not necessarily in that order.
The six levels have a moderate amount of traps and combat, enough to not be very boring and not too much to be bothersome. The only thing is that traps make backtracking somewhat annoying. If you recall the catacombs in Elvira 2, there was a wire-based trap that you could avoid by clicking on the wire and selecting avoid in the menu. You had to do it every time you want to traverse a passage with a wire and be very careful, as failing to do that means death. Well, it seems like no one realized how annoying is to travel a dungeon full of those traps and they are back. Yay!
Another very common type of trap are pressure plates that free boulders. You can’t avoid stepping on the plate, so you have to outrun the boulder and step out its path. Those two are the most common traps through the pyramid, but there are special rooms with their own unique traps that are a tad more interesting, but we will talk about them when we explore the pyramid.
Level 1

When we step into the waxwork, we are left helpless inside the pyramid as a stone wall rises behind us blocking the entrance. Sandy brown everywhere. Not the most interesting visuals to be honest. Advancing through the tunnel we can soon reach what seems the office of an architect. Someone was not very happy about his work, because the architect sits right at his desk with a dagger in his back. Our first weapon.
 |
| I love that when examining the body the description says that he has an ugly dagger wound in the back and he MAY be dead. Just may... |
Inside the office I found a weight inside a pot, some blank papyrus, ink, an oil burning lamp, several jugs and pots, an amulet with a beetle drawing on it and the corner of a burned papyrus, showing a map with some stairs and columns. Closer examination of the architect also showed another papyrus under his body that contained a drawing of anubis with nine symbols.
Here I started to notice that the interface and the overall design are not very user friendly. For starters, you can’t drop anything. I took a basket and a carpet just to see if they might have been hiding something, but then I could not drop them. It is not very annoying, but I can see how you could end up with a lot of trash in the inventory and no way of organizing it, because you can take almost anything here. But that is a problem, as you have to look inside every single pot in the room, and there are quite a few. As they are containers, if you take them and accidentally drop something over them, the item will be stored. It is very easy to lose track of items this way. It actually happened to me with the brooch. There doesn’t seem to be an inventory limit at least.
Anyway, soon after leaving the architect’s office we meet our first encounter. A soldier carrying a sword. Combat in this game is very straight forward. We have to click on the two swords icon on the right and the cursor becomes a sword. Clicking on the left of the screen makes our character slash from left to right. Click on the right side does the opposite movement. And clicking on the middle allows us to thrust our weapon. I was not able to notice any major differences between the three attacks. My intuition tells me that thrusting does more damage, and it might be possible that hitting the weapon carrying arm of the enemy from the sides makes them hit for less damage. But none of that is a problem, as usually thrusting a few hits usually kills enemies very fast, especially after getting a lance from one of the soldiers in this level. So, combat is not very interesting, just a clicking fest as soon as you see the enemy. And no respawns, which is also welcomed.
 |
| I never thought I would miss Elvira 1 combat. At least this doesn’t get in the way I guess |
There are also some statues decorating the pyramid that can contain pots with some items. Usual items are weights and tuning forks. Yep, tuning forks. If you are puzzled by this you didn’t play Elvira 2 or read through my playthrough, shame on you. There are some glass walls in the pyramid that can only be broken by using a specific tuning fork. For example the glass wall in this very level.
Another common element found in the pyramid are beams. These beams, or props as the game calls them, hold the ceiling of the pyramid. The idea is that you can knock them down and a stone wall from the upper level will fall. This frees the way in the upper level and it is usually safe to knock them down as soon as you see them as there is always a way around. The only problem is that we can’t do that right now, as it seem like we don’t have the necessary strength. More on that later.
If we continue exploring the pyramid, we can find some sand piles that we can take, another enemy in the form of a priest that is not very difficult to beat and a water-filled room. Looking into the water it seems like there is a large creature lurking below, but there is nothing we can do at the moment. Well, we can try to collect water from there, but as that ends up in our death, we can’t do anything productive. There is a treasure room nearby, but the only thing of interest are more pots, another weight and a tile with a hieroglyph.
Level 2

As soon as we reach the top of the stairs from level 1 we are greeted with a lethal puzzle. One that made me question if I was the one playing The Island of Dr. Brain. We are given two minutes to solve this:
 |
| I would have preferred some flamingos |
To be honest, at first I was a bit puzzled about what to do so I decided to make use of the in game hint system in the form of old uncle Boris. Clicking on the crystal ball icon on the left puts you in contact with the realm beyond and we can ask uncle Boris some things. The interface for conversation is based on dialogue trees à la LucasArts but with some of the questions costing psychical energy (PSY in the status bar). So we can get answers to where is the princess and what this Anubis sect nonsense is all about for free, but asking about specific puzzles, like for example this one or how to kill the alligator in the pool, or asking for healing costs some points. A very small amount, so it was never an issue to contact Boris.
As I was already there, apart from getting a clue for this puzzle and the next I decided to try the heal option, which transforms all papyrus in healing scrolls, each one healing for 10 HP. I only had four papyrus, meaning I could only recover 40 HP, not even enough to top me up at that moment, so I decided to apply save scumming to combat, as a well placed hit with the spear can in one or two hit an enemy, saving precious HP. You level up quite a few times before reaching this level. In fact, in level one you level up after every single enemy and after breaking the glass wall. The only thing I noticed changing was that my HP was getting higher but even then I didn’t want the risk of reaching a point I was unable to continue due to lack of HP.
 |
| So, what’s your plan after we defeat the witch? Should we put the crystal ball in family dinners? |
In any case, going back to the puzzle at hand, this is a magic square type of puzzle, but with a pentagram instead of a square. I will let you get the answer yourselves. Because maybe I am the evil twin. MUHAHAHAHAHA!... HA!
Once that is solved, exploration of level 2 is not very different from the first level. In fact, there are very few distinguishing things in the whole pyramid. This level introduces us to the pressure plates with boulders and the knockdown of beams. The first one is quite straightforward, as there are visible floor plates that when stepped on produce a sound and a boulder will soon come crashing everything in its path. Avoiding these is easy, as you only need to search for a side passage to hide but being careful, as boulders tend to do curves. For example, the boulder coming south from K4 will not stop until reaching M11. And the boulder will stay there, so it may block some paths.

We already commented on beams in level 1, but it is here on level 2 where we find a hammer in the statue of a slave boy at N4 that allows us to knock them down. Otherways, the whole south section of the level stays blocked by a wall at X11. So once you get the hammer you have to run back to level one to knockdown the beam, which blocks X11 at level 1 but opens the square at level 2.
Speaking of backtracking, the red square in the map is a pool of burning coal that we can not jump over. Exploration of this level produced another weight, another tuning fork and a pot full of entrails. This one can be used to lure the alligator out of the pool and kill it by throwing a spear. Sounds easy, but the problem is that there is no apparent way of throwing the spear. You have to start a combat and by trying to attack, our character will throw the spear instead, killing the alligator instantaneously
.
 |
| It took me a couple of tries. Fighting the interface is not a feature the game should be proud of |
With the alligator dead we can fill one of the numerous pots with water to extinguish the fire at level 2. Do you think it would be that easy? Of course not, because one is not enough. Nor two. Nor three. The number is five, if you were wondering, which made me lose a lot of time searching nearby statues and the treasure room for pots to fill with water and going back and forth to the fire until I managed to completely extinguish the fire. And my only question to that is why. Why make your players come and go from one level to another filling pots with water until the fire is extinguished? This is just adding more hours of gameplay by torturing the player. Did I mention that you have to click on the wires and select “Avoid” to not die every time you pass by one of those traps?
After getting pass by the burning coal, the only thing of interest is another tile found lying in the ground. Taking it is a bit difficult due to the interface. You can move by clicking on the arrows/compass on the left of the screen, by using the keyboard arrows or by clicking in the edge of the gameplay screen. But the tile sits right at the edge, so there are only a few pixels where you can get ahold of it.
Level 3

Once again we have a deadly problem as soon as we get to level 3. This time, the puzzle is quite simple. You have a set of pipes linked together with some switches that make the water go one way or another. At the end of the pipes there are six bottles, one with the symbol of Anubis and the other 5 a cobra. The goal is to set up the switches so that the bottle with the symbol of Anubis is filled before the other ones. Quite a nice and simple puzzle. Even the position of the good jar is randomized every time.
 |
| I really hope we don’t get a “Your princess is in another pyramid” after becoming a plumber |
After solving the puzzle, we are given access to level 3. This level complicates matters with glass walls by having you need a specific tuning fork for each wall. So basically, every tuning fork is the equivalent of a key to a door. Of the three glass walls here, only the first one can be broken with the forks we are carrying, while the other two need a fork from level 4, which means knocking down the beam here could be a death end, as you need the sand from level one to continue.
And what do you need the sand for? Well, there is a passage going south with a hanging pot in the middle and a Carving at the end of it. The carving is not very interesting but the pot is. It is tied by rope to a hole in the ceiling. At first I didn’t have any idea on how to continue but after striking the pot and seeing the rope disappear once it didn’t hold any weight gave me the idea of using the sand on the pot. And voila, that makes the carving disappear to show access to another part of the level. The only problem? The pot is cracked, which seemed to suggest that there was a timer on how long would the passage be open. For your peace of mind, you should know that there is no such a limit, but thinking there was kept me in my toes in this section.
 |
| It is nice that you can destroy the pot and see the rope disappear. It is a clue that could lead to a dead end but it is nice that you can do other things with puzzle items |
The only other thing worth mentioning here is that there is a room with a pressure plate. Instead of releasing a boulder, this one makes one of the statues of an archer in the room shoot at you, killing you instantly. The trick here is that there is a rock nearby that can be used to activate the trap and then we can go inside the room and take a bow and arrow from there.
Level 4
No more puzzles when arriving a level here, but this level is quite more interesting than the other ones. The first thing of notice is the large chasm, black squares, in the middle of the level. When we reach there, we can see a chasm and some kind of pillar at the other end described as a stone needle, but no apparent way of crossing the chasm. It is nice that the underlying levels have nothing on those squares, so you don’t feel cheated with the map design.
 |
| This level is so Last Crusade that this might have been a leap of faith |
Going the only way available, for which it is mandatory to have knocked down the beam downstairs blocking you from the rest of the pyramid temporarily, you get access to a new tuning fork that can be used to break the two remaining glass walls below. Which produces another tuning fork. God dammit.
So the only option with the needle that made sense to me was shooting the arrow, which made the needle fall and serve as a bridge. OK. At this point one would start to think that these cultist have a very rough day-to-day operation, having to continuously replace glass walls, shoot arrows to get access to the main temple…
After the chasm, we get another glass wall that we can break with one of the forks, another beam and the puzzle of the “Word of God” from the Last Crusade. You know, the one where Indy has to step on the letters of the word Jehovah in order to cross a trap room. Here is the same deal, but the letters are replaced by hieroglyphics. The goal is not to step on those associated with Anubis. Why would the cultist test your knowledge of all things not Anubis is beyond me, but the trick here is to pick symbols that do not appear in the papyrus we took from the architect at level 1.
 |
| And if you have to come back this way you need to solve the puzzle every time. Isn’t it fun? |
Level 5

Level 5 starts with a very deadly trap. Once you enter the square hall at U8, a wall blocks your way back to the stairs and the passage starts to fill with poisonous gas. After several tries and not knowing what to do, I contacted Boris who told me to watch out for things in the floor and walls. Thanks for nothing I guess. There is a mirror in one of the walls but you won’t see it while navigating the hall. You have to turn on every single square and look at each wall, making this one a very annoying puzzle, because the gas starts to block your vision very soon.
 |
| We don’t look that different from a common soldier to be honest |
Anyway, we have some experience on how to treat glass in this game, so it is not a problem for our collection of tuning forks. Afterwards, we find a passage with a dead artist, our twin brother doesn’t seem too kind on his employees, under a mural dedicated to Hathor, with a depiction of the deity’s name. The artist has another brooch with a beetle that he obviously is not going to need anymore.
Forward ahead we reach the end of the passage, a room with several not very inspiring murals. But we can tap each of them and the one to the south produces a hollow sound, which suggest something behind. To open the way, we have to attack the wall, which again doesn’t seem to be very in line with how to use objects in this game. This leads to a room full of carvings of snakes in the wall and a lot of holes. Trying to look at the holes suggest that there must be a lot of mot******ing snakes in this mot*****ing pyramid.
There is a tile in the ground, but trying to take it ends up in… a crash. Yes, the game crashes. Every single time you try to take the tile. I felt a desperation at this point thinking I wouldn’t be able to complete the game that I was at the point of writing a “Lost” post, which I am sure is a record for a main game. Lucky for me, people at the GOG forum had also found the bug and why it happens. There is a pot full of oil at the beginning of the game, at the architect’s office. Either I didn’t notice it or didn’t think it was important. That pot is the solution to this chamber but the game doesn’t know what to do if you try to take the tile and don’t have the pot with you. I would fire that programmer to be honest, because that some shitty code.
 |
| I would like to think that cobra is the programmer responsible for this |
So I went all the way down, took the oil and went back there, dying a few times in the wire traps along the way, and with the pot in my possession now I could take the tile. And die. You have to drop the pot first, which breaks it and extends oil all around the place, light it, hope to not die in the fire and take the tile. Aaaaaaaaaand find another bug. When you take these tiles, they can simply disappear in your inventory. Not hide in a container as I suggested at the beginning. No, they simply disappear. Great.
One reload later I was capable to taking the tile with me, but I was blocked with no way ahead. I went back to the artist and the mural of Hathor could also be tapped and broken, showing the way to level 6. Yes, the map there looks weird, but I am pretty sure that’s because the chasm and the Word of God puzzle are not exactly 3 and 2 squares.
Level 6

Reaching level 6 puts us in front of a mural dedicated to Hathor with a hole for four tiles. In the mural bellow there is a box with the name of the deity, and we have four tiles with the same drawings in them, so it is a matter of putting them in place in the correct order. Take into account that we destroyed the mural to get here, so I should thank that I was blogging the game because otherwise I might not have had an screenshot of the mural.
 |
| I sincerely hope you have a good memory if you didn’t take a picture of the mural |
The final level is quite straightforward. There are two treasure rooms with more weights and a room with a scale and a sarcophagus. The sarcophagus can be opened by inserting one of the brooch in the conveniently beetle shaped hole, which reveals the princess inside. She is quite eager to join us to escape this nightmare.
 |
| Even the princess looks like Cassim. I am starting to think this guy became obsessed with himself and imagined the evil twin story while going on a murderous rampage |
The scale puzzle is as basic as it gets. You have six weights, the last one can be found inside the sarcophagus after the princess joins us, and you have to balance the scale. I started to put weights in every plate and got it even as soon as I put all six of them on my first try just by trying to compensate the scale with every weight. It was just luck, as every weight has a different… well... weight and you have to take some attention to what you put in each plate. Getting a perfect balance opens up a passage next to the sarcophagus which leads to a very anticlimactic fight with our brother. He fell after two hits of my trusty spear. These twins maybe super evil but not very resilient.
 |
| Hello brother. Goodbye brother. |
Behind him, a gigantic statue of Anubis with a woman shaped figure at its feet. We can climb the statue to find a brooch shaped hole that once filled with the other brooch allows us to push the woman figure and escape the pyramid. Happy ending?
 |
| Why didn’t we use this entrance? |
Back to the waxwork
And so, Cassim lived happy ever after. In my introduction to the game I forgot to mention this fellow:
 |
| Basically, uncle Fester if played by 80’s Arnold Schwarzenegger |
He is Boris’ butler and he is in charge of asking us for the pirate protection code, which the GOG version has limited to always being the same number, and showing us to the waxwork. I didn’t mention him because even in spite of his creepiness I thought it completely inconsequential. That is, until I got back from the pyramid. Then he starts to follow me around pushing me to other waxworks. I am sensing some evil here…
DEATH BONUS ROUND (TOTAL DEATHS: 11)
It just occurred to me that I haven’t explained what I mean by unique death: those that have a unique final death image. For example, it is the same final image with spikes dying by the second level pentagram puzzle, the third level bottles puzzle or the Word of God puzzle, so all of those only count as one.


Session Time: 4h 25 m
Total Time: 4h 25 m
Note Regarding Spoilers and Companion Assist Points: There’s a set of rules regarding spoilers and companion assist points. Please read it here before making any comments that could be considered a spoiler in any way. The short of it is that no points will be given for hints or spoilers given in advance of me requiring one. Please...try not to spoil any part of the game for me...unless I really obviously need the help...or I specifically request assistance. In this instance, I've not made any requests for assistance. Thanks!
I wonder how enjoyable will be playing "Waxworks" compared with the two Horrorsoft's previous games. I played and finished both "Elvira" and "Elvira 2", and both games became tedious and I finished them with a guidebook in my hand, but I played "Warworks" with the only help of two other players who were playing the game at the same time, and never got bored. I think that the more strict "compartmentalization" of the game in four distinct and separate "stages" made it a much more tighter and focused experience for me. Whatever the reason, unlike with "Elvira" and "Elvira 2", I never had the feeling that "Waxworks" had overstayed its welcome.
ReplyDeleteThe more episodic element will definitely help for dead-end scenarios, as you don't have to backtrack so far when stuck. A great pain of earlier games was missing items that were so far removed from your current predicament that you were really mad when you had to go all the way back for them (looking at YOU Amazon).
DeleteI've just started playing and I'd like to thank you for including maps. I'm too lazy to map the place myself so I've printed out yours and am ready for action.
ReplyDeleteWhen I was younger, I used to love making maps - as The Bard's Tale and the Ultima games will attest. Aren't people supposed to get MORE patient with age?
I own this, from the early days. All disks and manuals. I even keep the box.
ReplyDeleteAnd...of course, never managed to finish it.
I remember having complete the Graveyard, which is in my opinion one of the less cryptic levels.
I remember making progress in the rest of the levels, but man, this game wins the nobel prize for the most cryptic game I have ever played. Between the confusing and weird interface and un-intuitive puzzles...!!!...anyway...
Thanks to a few walkthroughs around the web, and this page of yours, I finally managed to beat it...after..30 years lol...I
The Pyramid is just crazy...in this level I went straight to the walkthrough...other levels I managed to figure stuff by myself - but...that one is nuts!
Have a good one!